Saturday, April 9, 2011

pen tool & paths

Here’s a little more on the Pen Tool and the Paths feature.
Like I mentioned earlier, these sort of go hand in hand.

Open an image of a really cool hot rod like I have here –or go outside and take a picture (image) of your lame Ford Pinto.

Load that onto you computer and view it larger by pressing the Command and (+) sign together a few times.
Use Command and (-) sign to make it smaller Einstein. Duh.

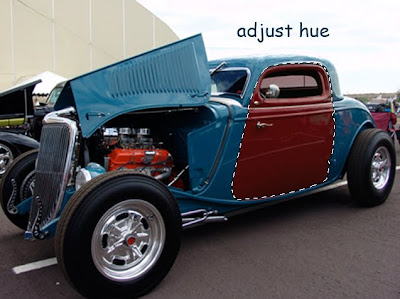
Now get the Pen Tool (press P) and carefully draw a “path” around the door or some other part that you want to alter. This will create a thin line (it’s a path) Remember to join the ends by clicking on the first point you made.

Again choose Window / Paths from main menu bar - (make sure the little box marked Work Path is highlighted - click on it if its not) then choose “make selection” from within the little tiny drop down menu in the top right corner. Choose OK (feather radius to 0 or 1 – leave new selection & anti-alias checked).

Now you see the “marching ants”

Now go to your main menu bar and choose Select / Save Selection and give it an imaginative name like “dented Pinto door”. You may want to retrieve this later so you need to save it.

At this point you have created a selection which you can screw around with and do all kinds of real cool stuff with like:

Alter the hue
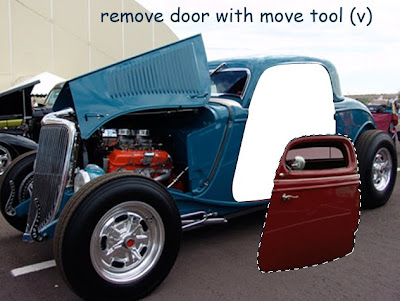
Remove the door (grab it with the Move tool and drag it away)
Copy & Paste the door into another
Image
Duplicate the door
Reverse it (Edit /Transform /Flip)
Spin it around (Edit /Transform /Rotate)
Make it smaller or bigger (grab a node and move it)

Use your imagination for crying out loud - you're supposed to be a designer!

I don’t know why you would do these things, but the point is you can.
Now imagine what you can do to other images with this little bit of power.

Try putting a third eyeball in your buddy's forehead. Its fun.

Don’t you feel smart and important now?


Friday, April 8, 2011

hue & saturation


Color is a property of light.

If you don’t understand that, tonight when it gets dark, step in front of a mirror and look at your face. What color do your eyes appear to be? If your answer is red, come back later when you’re not quite so baked.

Now turn off the lights. What color do your eyes appear to be now?

See? Without light there is no color. Simple.

OK let’s see what we can do with a very simple feature called Hue & Saturation.

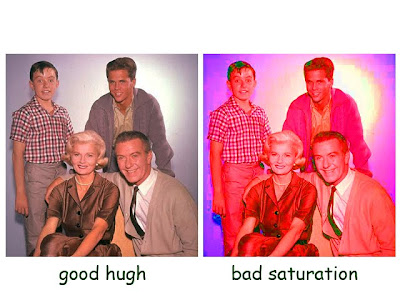
This means: what color is it (hue) and how “bright” does it appear (saturation).

Open your image (its not a picture – its an image) then press M to get the elliptical marquee tool - draw out a circle shape around your apple. To make it go away press Command D (deselect). Try again until you get the shape right.

By the way, I’m on a Mac so the keyboard shortcuts for you Window dorks are different - figure it out.

Now go to: Image / Adjustments / Hue & Saturation

Goof around with the 3 sliders until you achieve the desired effect. (red apple).

If your shape needs to be something besides a circle, oval or square…choose the pen tool (press P) - draw a shape by clicking around your object, making sure to join the ends by clicking on the first point you made. Think of it as a fence enclosing a piece of pixel-land. Close the fence.

BTW - There's a bit more detail on this in the next post (pen tool & paths)

Now choose Window / Paths / and choose “make selection” from within the Paths drop down gadget. Keep the feather radius to 0 or 1 for now until you get the hang of it.

You’ll see the “marching ants” crawling around your selection. Everything inside the selection will be affected by whatever you do at this point. To choose the opposite go to Select / Inverse.

Practice using the Pen tool along with the Path feature and soon you will be ready to roam the Earth grasshopper.


Monday, March 28, 2011

cropping


crop

–noun

the cultivated produce of the ground, while growing or when gathered:

the wheat crop.

–verb

to cut off or mask the unwanted parts of a photograph.

Proper cropping as opposed to crappy cropping can make the difference between a decent photo and that garbage you usually post on your lame Facebook page. Nothing like a good crop. My Grampa who was a photographer always said …never pass up an opportunity to crop.

Cropping is like editing.

An editors’ job is to identify the crap and remove it. Crop it out.

Be the first one on your block to post your Disneyland pictures without all the dopey looking nobodies in the background who are breathing your air and wrecking your “memories”. They’re all a bunch of worthless knuckle dragging bums anyway so why not eliminate them from your world and pretend they don’t exist (like your weirdo uncle with the lunchmeat fetish.)

Press the C key on your keyboard to get the Crop Tool.

Drag out a box and adjust it by grabbing those tiny little boxes (they’re called nodes) and adjust the box. Press Return (Im on a Mac) to apply the crop. Simple, just the way you like it.

Now go have another cocktail and enjoy your undeserved sense of accomplishment.

BTW –that old man in the sample is a survivor of Pearl Harbor.

If you don’t know what that means, go away and never come back to my blog.

Or… Google it and learn something besides what’s ”hot”.

Then you may return.

Thank you.

Thursday, March 24, 2011

smart blur


The smart blur is useful for quick removal of unsightly wrinkles, pimples, freckles, nose hairs, scars, scratches and yes…warts. Go to Filter / Blur / Smart Blur and set your quality to medium, mode to normal and goof around with the other 2 sliders who’s names (radius & threshold) mean nothing to me but sound real cool, until you get Amy to look like a human being. Seriously, if you want a miracle go to church –Photoshop is only so powerful.


Welcome to Slick Mick's Tips & Tricks


Do you have Photoshop on your computer and very little idea what to do with it?

Don’t know the difference between a pixel and a pica?

Ever wonder how to remove that nose wart from Grandma’s portrait and make it look convincing?

Ever wasted an entire afternoon, trying to figure out why a postage stamp sized photo of your cousins ugly baby can’t be “enlarged” to the size of a freeway billboard without becoming so fuzzy it would have to be viewed from outer space to seem natural.

Maybe you’ve always wanted to be a graphic artist and feel your nearly there because you stumbled across “Word Art” in your text editing program and read somewhere that yellow and blue “go good together.”

If so and you’re looking for solutions to these and other profound and enigmatic mysteries, then read on silly mortal.

It’s been suggested to me that I write this blog to share some of the tips & tricks I’ve discovered, invented and stolen over the past years while passing myself off as graphic designer.

So put down your remote control, brewski, ham sandwich, porn, or whatever you have in your hand right now - and learn something new, so next time you need to remove that bong from the background of your vacation hotel picture, you’ll know what to do.